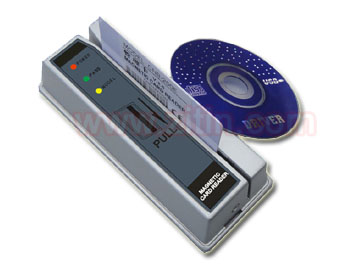
Networked bank magnetic-card access control machine, ATM bank card reader Shanghai Zitin +86 21 68568185
I. Safety Instructions
Thank you very much for purchasing this product. To use it correctly, please read this operation manual carefully before use.
II. Overall Product Features
1. Supports both online and offline operation. Comes with the ** V3.0 magnetic-card access control management system software.
2. Supports up to ** than 2,** authorized card-number feature records, plus batch wildcard card-number authorization.
3. Supplied with a dedicated management card, allowing convenient authorization management of all card types offline.
4. When online, batch authorization of VIP cards by any feature digits is possible. After online authorization via a PC, the magnetic-card access machine can perform normal card-swipe authorization recognition offline.
5. The application software can set all-card open, allowing any bank magnetic card to open the door; this function can also be turned off at any time.
6. Blacklists can be set via the application software to conveniently block certain cardholders from entering.
7. Remote door opening can be performed conveniently via the application software, and the permissions of authorized cards can be easily modified or deleted.
8. Features batch import of the authorization list from EXCEL, making batch authorization very convenient.
9. Features batch authorization-status modification, letting all card-number authorization data from one card machine be easily downloaded to another.
10. Uses an advanced hashing algorithm to ensure fast and reliable card-reading and door-opening response.
11. Uses the ** communication protocol to ensure stable and reliable serial communication, greatly improving anti-interference performance.
12. If the unit is pried open on site, once the PC receives the tamper signal it immediately sends out an alarm signal.
13. The magnetic head reading conforms to ANSI/ISO standards.
14. Zinc-alloy metal housing, sturdy and durable; tamper-proof screw fixing for anti-theft and anti-pry protection. Imported alloy magnetic head, highly wear-resistant and sensitive.
15. Adopts ** anti-interference measures, suitable for installation and use in all kinds of environments.
III. Product Application Description
1. This product is an all-in-one magnetic-card access control machine. Via the card machine or the PC application software, individual or batch (by category) authorization can be performed for various magnetic cards (bank cards, postal cards, VIP cards, membership cards, etc.), so that only specific cardholders are allowed entry (e.g. a certain category of banks, specific banks in a certain region, certain VIP customers, distinguished guests, etc.).
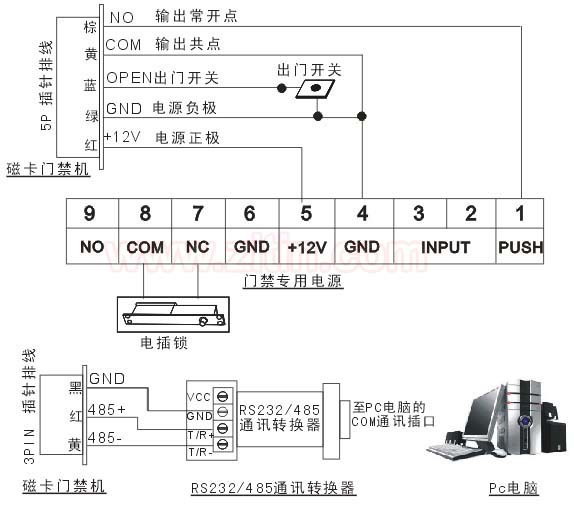
2. When connected to a PC via RS232/485 conversion communication, on-site card swipes are recorded in real time on the PC, and remote anti-pry alarm and remote door opening are enabled.
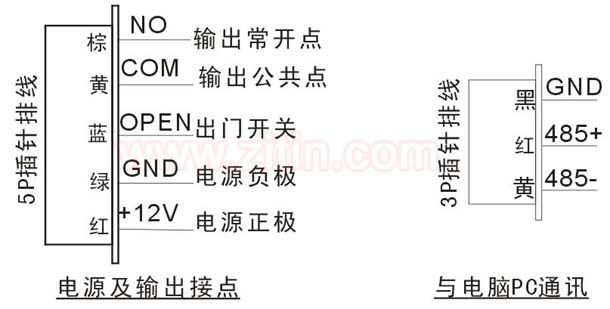
3. This all-in-one magnetic-card access machine has two outputs: one RS485 signal to the PC for backend authorization, logging, alarm and remote door opening; the other a relay dry-contact output directly to the access system to release the electric lock or automatic door.
4. This all-in-one magnetic-card machine comes with application software (one CD). It can be used online or offline.
IV. Panel Indicators and Internal Components
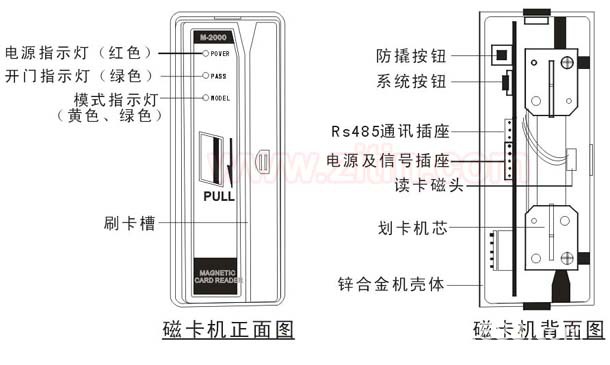
1. This magnetic-card access machine is equipped with a tamper alarm button (see figure). As soon as the unit leaves the mounting wall, the tamper button pops out automatically, the system emits a short, rapid beep, and an alarm signal is instantly sent to the PC via communication.
2. When powered on for the first time, the red power light and yellow mode light turn on together and emit two long beeps (beep--beep--); then the yellow light goes out, system self-test ends, and the machine enters normal operation mode.
3. In normal operation mode, swipe an authorized magnetic card smoothly from top to bottom; the unit emits a long beep and the ** door-open indicator lights up. The system then outputs a door-open contact signal for the access door (this contact signal is held for 3s).
V. Input/Output Lead Definitions
VI. Card Reader Wiring Diagram
VII. Magnetic Card Authorization (Offline)
1. Management card:
For user convenience, our company provides a management card (see packing list). This management card allows convenient authorization operations, either for a single card or by matching
the first 4 to 12 feature digits of the card number for batch authorization.
2. Single-card authorization:
In normal operation mode, swipe the management card smoothly three times in a row; after 3s the ** mode light turns on and a long beep sounds, and the system enters single-card authorization mode (valid for 5s). You can continuously
swipe in cards one after another; each swipe emits a long beep indicating successful authorization of that card. After 5s the ** light turns off automatically and the system returns to normal operation mode.
3. Batch authorization by the first four digits of the card number:
In normal operation mode, swipe the management card smoothly four times in a row; after 3s the ** mode light turns on and a long beep sounds, and the system enters batch-authorization mode by the first four digits (valid for 5s).
Just swipe in one magnetic card whose first four digits meet the condition; each swipe emits a long beep indicating that batch cards matching those first four digits are authorized. After 5s the ** light turns off and the
system returns automatically to normal operation mode.
4. Batch authorization by the first (5th, 6th, 7th, 8th, 9th, 10th, 11th or 12th) digits:
In normal operation mode, swipe the management card smoothly (5, 6, 7, 8, 9, 10, 11 or 12) times; after 3s the ** mode light turns on and a long beep sounds, and the system enters the batch-authorization mode by the first
(5th, 6th, 7th, 8th, 9th, 10th, 11th or 12th) digits of the card number (valid for 5s). Just swipe in one card whose first (5th, 6th, 7th, 8th, 9th, 10th, 11th or 12th)
digits meet the condition; each swipe emits a long beep indicating that batch cards matching those digits are authorized. After 5s the **
light turns off automatically and the system returns to normal operation mode.
5. Changing the management card offline:
If the management card is lost, any magnetic card at hand can be used to generate a new management card:
First cut the power, open the back cover, and hold down the system button without releasing. At 40 seconds after power-on the orange light turns on and a long beep sounds; before the yellow light goes out, immediately swipe the corresponding magnetic card twice in a row. After hearing a long
beep, that card becomes the new management card.
6. Deleting all authorized cards offline:
When offline, all authorized cards can be deleted on the unit:
While powered on, keep holding the system button for 40 seconds until all three lights turn on; release immediately, then wait patiently for another 40 seconds. When the orange and ** lights go out and a short beep sounds, all authorized card data is deleted.
(Note: the existing management card is not deleted and remains valid.)
VIII. Interface of the Magnetic Card Access Management System V3.0
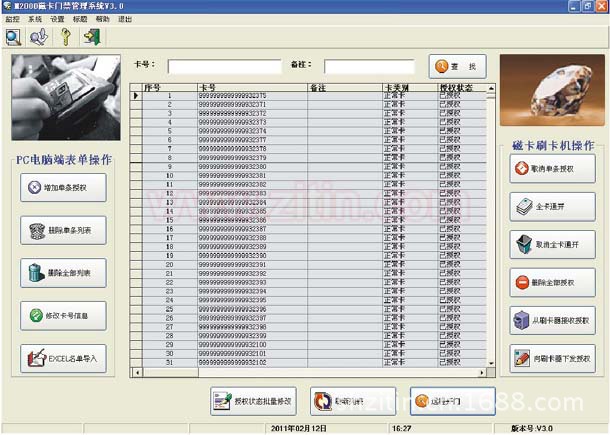
1. Take out the supplied CD and install the software on the PC. When installation prompts for a Serial number, it can be filled in arbitrarily. After installation, a shortcut icon for the M**0 Magnetic Card Access Management System is created automatically on the desktop.
2. Double-click the desktop M**0 Magnetic Card Access Management System; a system login password window appears. The default initial password is 666666. Click Confirm to open the management system software.
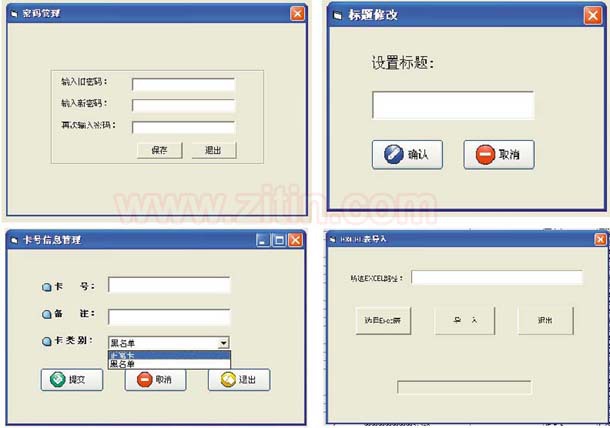
3. For security, please set a new password! Click the System menu and a Password Management dialog appears; re-enter the new password, and when "saved successfully" appears the new password will be used next time you open the system.
4. Start wiring: connect the card reader communication signal to the PC COM serial port via a converter. See the wiring diagram in the user manual for details. Note: be sure to select the correct COM number according to the PC COM port, via the menu Settings - Port Selection - choose COM1 to COM8.
5. Click Title on the PC menu, then click Modify Title; a Modify Title dialog appears. Enter your company name and click Confirm.
6. How to add authorized cards:
Single-card authorization:
Click Add Single Authorization; a Card Number Information Management dialog appears. Fill in the card number and remarks, e.g. enter card number 9558804000118866932, and the single-card pre-authorization takes effect.
Batch authorization by the first 4 to 12 digits:
Click Add Single Authorization; in the Card Number Information Management dialog, enter the first digits of the card number followed by * to stand for the remaining batch digits; this is the batch pre-authorization.
For example, entering card number 95588040* enables batch pre-authorization by the first 8 feature digits.
Batch authorization by specified feature digits:
Click Add Single Authorization and, in the dialog, enter e.g. card number 95588###88######688; then VIP cards matching this feature are pre-authorized. (Note: with this method, use # to fill in all the other generic digits of the total length.)
Management card authorization:
Click Add Single Authorization; in the Card Number Information Management dialog, append a question mark to the card number as the card number entry, and be sure to select Normal Card in the remarks. For example, enter 9558804000111098988?; after pre-authorization succeeds, that card becomes the management card.
Blacklist authorization:
Click Add Single Authorization; in the Card Number Information Management dialog, be sure to select Blacklist as the card category and enter the card number correctly; pre-authorization then succeeds. For example, enter card number 62226013**03972692 and select Blacklist in the remarks; once pre-authorized, the system treats that card as blacklisted and it cannot enter.
All-card-open authorization:
Click All-card Open so that any magnetic card can open the door by swiping; click Cancel All-card Open again to turn this function off.
7) Importing the authorization list from EXCEL:
To make batch import easy, create an EXCEL list file in advance following the rules below, then click EXCEL List Import, select the stored file,
and the authorization list is quickly batch-imported into the PC form, equivalent to successful pre-authorization of the batch list. EXCEL list file rules: A. The table has 5 columns. B. The first column is Card Number, and this column must be formatted as Text. C. The second column is Remarks, which can hold notes such as name and bank VIP category, e.g. "BoC Ward Zhang Zhentao". D. The third column is Card Category, filled only as Normal Card or Blacklist. E. The fourth column is Authorization Status, filled only as Unauthorized or Authorized; new lists are generally filled as Unauthorized. F. The fifth column is card number length, which must be filled in, e.g. enter 19 for a 19-digit number.
7. After any Add Authorization operation, the authorization data is only entered into the PC as pre-authorization. You must also click Send Authorization to Reader; only after it is sent successfully does the authorization actually take effect.
8. When a card is swiped, the record is displayed in the second menu icon, Real-Time Monitoring. (Note: when the administrator leaves the PC, the system must be left on the Real-Time Monitoring screen; to exit, a password dialog appears, so without the password no one can exit or change the main interface. (Remark: for the PC to reliably record card swipes, all three of the following must hold: 1) the PC is on, 2) the PC is successfully connected to the reader, 3) the application is open.))
9. Canceling a single authorization:
Select the card number with the mouse and click Cancel Single Authorization on the right to cancel that card.
10. Deleting all authorizations:
Click Delete All Authorizations on the right to delete all authorized cards.
11. Deleting a single list entry:
Select the card number with the mouse and click Delete Single Entry on the left to remove it from the card-number list on the PC. (Note: the authorization in the reader itself is not deleted; only the list on the PC is removed.)
12. Deleting the entire list:
Click Delete Entire List on the right to delete all card-number list entries on the PC. (Note: the authorization in the reader itself is not deleted; only the list on the PC is removed.)
13. Importing the authorization list from one reader to another:
Click Receive Authorization from Reader on the right; all authorizations on that reader are received into the PC form. Click Batch Modify Authorization Status to change all entries from Authorized to Unauthorized, then switch to the other reader and click Send Authorization to Reader on the right; the authorization list is then successfully imported from one reader to the other.
14. Remote alarm:
When the on-site reader is pried open, it sends an alarm signal to the PC, and a red-background, yellow-text warning flashes continuously on screen. After manual handling, click Cancel to clear the alarm.
15. Remote door opening:
Click Remote Door Open and the door is opened remotely. (Note: remote door opening is reliably recorded in Monitoring - View Records.)
16. Click the Monitoring menu on the PC, then click View Records to search, clear records, and print.
17. Click the Monitoring menu on the PC, then click the Detail Records Summary Report dialog. Click the first icon to print this report, and the second icon to save the Detail Records Summary Report to an EXCEL file.
18. The PC form provides a search function by Card Number or Remarks; just enter the card number or remark you are looking for, and the system automatically finds and selects the corresponding pre-authorization row.
19. Because the system operates in a single thread, do not click Remote Door Open while clicking Send Authorization to Reader or Receive Authorization from Reader.
IX. Special Precautions
1. Note carefully that the input supply voltage is DC12, not DC24V. Use a regulated DC power supply with sufficient capacity and good voltage stability.
2. Before wiring, be sure to confirm the correct polarity of the supply voltage to avoid burning out the unit.
3. To ensure system safety, it is recommended that the wiring for the access electric lock not be connected directly to this unit; the magnetic-card access machine only sends a contact door-open signal to the dedicated access power supply, which in turn controls the electric lock.
4. Because RS485 communication is used, the remote distance between the magnetic-card access machine and the PC should be kept within 800 meters; avoid running the cabling close to power cables, and use dedicated network cable for the communication line.
5. When swiping, always swipe smoothly from top to bottom; do not swipe in reverse.
6. Do not use anything other than cards to swipe; under normal conditions, clean the magnetic head with a dedicated cleaning card every 120 days.
7. Per the factory serial number, this unit carries a one-year warranty (excluding damage caused by misuse).
X. Main Technical Parameters
Input voltage: DC12V±5% Standby current: 32mA Operating current: 52mA
Output signal: relay normally-open dry contact Contact capacity: 2A 12VDC Output hold time: 3S
Communication: RS232/485 Baud rate: 9600 bps Allowable swipe speed: 10-120cm/s
Magnetic card standard: ISO7811-7815
XI. Packing List
1. All-in-one magnetic-card access machine -------------------------------- 1 unit
2. Mounting screws and dedicated wrench ----------------------------------- 1 bag
3. 5P and 3P socket connection cables ------------------------------------- 1 each
4. Desiccant ------------------------------------------------------------------- 1 bag
5. Application software CD V3.0 --------------------------------------------- 1 disc
6. Management card ------------------------------------------------------------- 1 card
7. All-in-one Magnetic Card Access Machine User Guide --------------------- 1 copy
Networked bank magnetic-card access control machine, ATM bank card reader Shanghai Zitin +86 21 68568185




























 Current location: Home>